Making wood-fired pizza at home is not just about cooking—it’s an experience. From choosing the right wood to crafting the perfect dough and sauce, every step adds to the flavor and fun. Whether you’re a first-timer or a seasoned pizza maker, this guide will help you create a delicious, crispy, and smoky pizza right in your backyard.
Key Takeaways
- Choose hardwood like oak or maple for the best flavor and consistent heat.
- Let dough rest at room temperature for at least 2 hours before using.
- Preheat oven to 750°F for authentic pizza results.
- Use fresh, high-quality ingredients for sauce and toppings.
- Rotate pizza frequently in the oven for even cooking.
Choosing the Right Wood for Your Pizza Oven
Types of Wood to Use
When selecting wood for your pizza oven, focus on hardwoods like oak, maple, or beech. These burn longer and hotter, making them perfect for achieving that crisp, evenly cooked crust. Fruitwoods, such as apple or cherry, can add subtle flavors to your pizza. Softwoods like pine are not ideal because they burn too quickly and can leave excessive residue.
Why Wood Choice Matters
The wood you choose directly affects the flavor and cooking process. Hardwoods generate consistent heat and minimal smoke, ensuring your pizza bakes evenly. On the other hand, poorly chosen wood can lead to uneven cooking or even a bitter taste. Using seasoned wood (wood that has been dried for at least six months) is essential for reducing moisture and smoke.
Avoiding Harmful Woods
Steer clear of treated or painted woods. These can release harmful chemicals when burned. Also, avoid using green or wet wood, as it creates excessive smoke and uneven heat. Stick with natural, untreated hardwoods for the best results.
A good rule of thumb: If the wood smells off or looks treated, don’t use it. Quality wood ensures quality pizza.
Preparing Your Pizza Dough
Selecting the Best Ingredients
When it comes to pizza dough, the ingredients make all the difference. Start with high-quality flour—bread flour is a popular choice because it has a higher protein content, which helps create that chewy texture we all love. You’ll also need yeast, salt, and water. If you want to take the flavor up a notch, consider adding a drizzle of olive oil or a teaspoon of sugar to the mix. The key is balance—each ingredient plays a crucial role in the final product.
Kneading Techniques for Perfect Dough
Kneading is where the magic happens. After mixing your ingredients, transfer the dough to a lightly floured surface. Use the heel of your hand to push the dough forward, then fold it back over itself. Rotate it slightly and repeat. Aim for about 8-10 minutes of kneading until the dough is smooth and elastic. If you’re short on time, a stand mixer with a dough hook can save the day, but there’s something satisfying about doing it by hand.
Allowing Dough to Rest and Rise
Once kneaded, place the dough in a lightly oiled bowl and cover it with a damp cloth or plastic wrap. Let it rest at room temperature until it doubles in size—this usually takes about 1-2 hours. If you’re prepping ahead, you can refrigerate the dough for up to 24 hours; just bring it back to room temperature before using. This resting period allows the gluten to relax and the yeast to do its job, creating a dough that’s easy to stretch and full of flavor.
Setting Up Your Wood-Fired Oven

Building and Lighting the Fire
Getting the fire started is where it all begins. Start by stacking your wood using the “log cabin” or “cross-stack” method. Here’s how:
- Lay two pieces of kindling parallel to each other as a base.
- Place three pieces perpendicular on top of them.
- Continue alternating layers until the stack is about as high as the oven entry.
- Slide the stack into the oven’s center and light it using a match or a small torch.
For easier ignition, you can use crumpled paper or fire starters. Consistency in how you build the fire ensures even heat distribution.
Achieving the Ideal Temperature
Once the fire is burning, you’ll need to monitor the oven’s temperature. Most wood-fired ovens take about 2-3 hours to reach the ideal cooking range of 750°F to 900°F. Use an infrared thermometer to check the surface temperature of the oven floor. If it’s too cool, the crust won’t crisp up; too hot, and it might burn.
Pro tip: Let the fire burn down to glowing embers before spreading them evenly across the oven floor. This helps maintain consistent heat.
Maintaining Consistent Heat
Cooking multiple pizzas? You’ll need to keep the temperature steady. Add small pieces of wood periodically to maintain the heat without creating too much smoke. Push the embers to the side or back of the oven to make room for the pizza while keeping the heat source close.
A well-maintained fire makes all the difference. If the heat drops, your pizzas will take longer to cook, and the texture might suffer. Stay attentive!
Crafting the Perfect Pizza Sauce
Using Fresh Ingredients
The key to a great pizza sauce lies in its simplicity and freshness. Start with high-quality canned whole tomatoes, like San Marzano, which are known for their rich flavor and low acidity. Blend the tomatoes by hand or with a blender, keeping a slightly chunky texture for authenticity. Add a pinch of kosher salt to enhance the natural sweetness of the tomatoes. Fresh garlic and a drizzle of olive oil can take your sauce to the next level, providing depth and aroma.
Balancing Flavors
Balancing the flavors in your sauce is all about subtlety. Avoid overpowering the natural taste of the tomatoes with too many spices. A sprinkle of dried oregano or basil can add a nice herbal touch, but keep it light. If the sauce feels too tangy, a small pinch of sugar can help mellow it out. Remember, the sauce is the foundation, but it should complement—not overshadow—your toppings.
Storing and Reusing Sauce
If you make more sauce than you need, don’t let it go to waste. Store leftovers in an airtight container in the fridge for up to a week. For longer storage, freeze the sauce in portion-sized bags or containers. This way, you’ll always have homemade pizza sauce ready for your next pizza night. Reheat gently on the stove before using to maintain its fresh flavor.
A well-made pizza sauce is like the soul of your pizza—it ties everything together, making each bite unforgettable.
For a super easy recipe, consider this combination: canned whole tomatoes, olive oil, grated onions, pressed garlic, dried seasonings, sugar, and salt. This mix creates a flavorful base perfect for any homemade pizza. Learn more about this easy pizza sauce recipe.
Mastering Pizza Toppings

Choosing Quality Ingredients
The foundation of a great pizza starts with top-notch toppings. Freshness is key. Whether you’re using classic choices like mozzarella, basil, and San Marzano tomatoes or experimenting with something unique, make sure your ingredients are as fresh as possible. Fresh mozzarella, for example, should be drained thoroughly to avoid making your pizza soggy. The same goes for other ingredients with high water content, like pineapple or roasted bell peppers—pat them dry before using.
Layering for Even Cooking
Layering your toppings properly can make or break your pizza. Start with a thin layer of sauce—just enough to cover the dough without drowning it. Add cheese next, spreading it evenly across the surface. Then, place your toppings strategically. Avoid piling them in one spot; instead, distribute them evenly to ensure everything cooks at the same rate. If you’re using delicate ingredients like fresh basil or prosciutto, add them after baking to preserve their flavor and texture.
Creative Topping Combinations
Why stick to the usual when you can mix things up? Here are some fun combinations to try:
- Margherita: San Marzano tomato sauce, mozzarella, and fresh basil (add basil after baking).
- BBQ Chicken: BBQ sauce, mozzarella, shredded chicken, red onion, and cilantro.
- Potato & Truffle: Truffle oil, mozzarella, thinly sliced Yukon gold potatoes, and caramelized shallots.
- Pear & Prosciutto: Olive oil, mozzarella, caramelized onions, pear slices, and prosciutto (add prosciutto after baking).
Experimenting with toppings is part of the fun. Don’t be afraid to try unusual pairings—you might just discover your new favorite pizza!
For a truly authentic Italian experience, consider using traditional ingredients like San Marzano tomatoes and fresh mozzarella. These staples bring a touch of Italy to your wood-fired pizza.
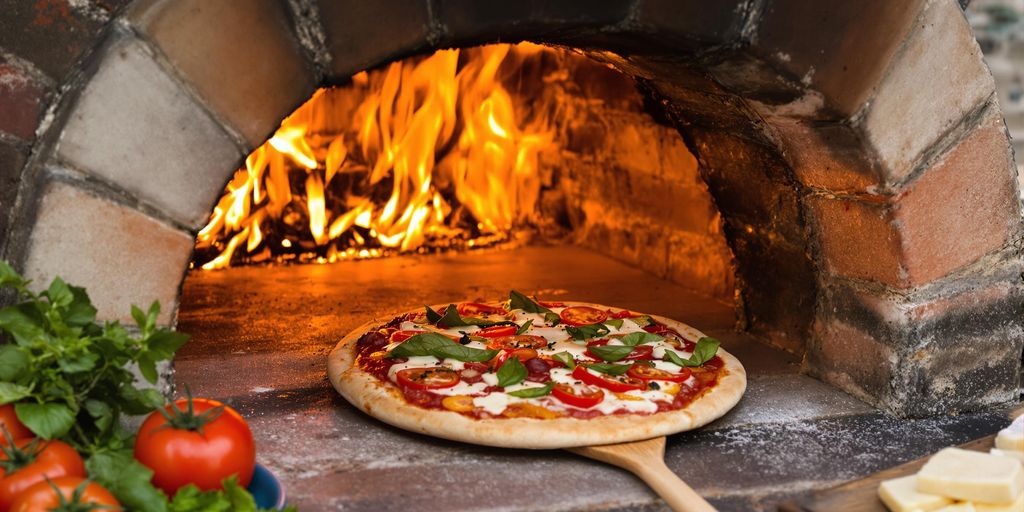
Cooking Your Pizza to Perfection
Transferring Pizza to the Oven
Getting your pizza into the oven can feel like a high-stakes moment, but it doesn’t have to be. Start by dusting your pizza peel generously with flour or cornmeal—this helps the dough slide off easily. Carefully place your stretched dough onto the peel, then add your toppings. Give the peel a little shake to make sure nothing is sticking. When you’re ready, position the peel at the edge of the oven floor and, in one swift motion, pull it back while letting the pizza slide forward. Confidence is key here! If you hesitate, the dough might fold or stick.
Monitoring Cooking Progress
Once your pizza is in the oven, keep an eye on it—it cooks fast in a wood-fired oven, often in under two minutes! Look for bubbling cheese, slightly charred edges, and a golden crust. Avoid opening the oven too often, as this can cause heat loss. A good rule of thumb is to check every 30 seconds or so. If you’re cooking multiple pizzas, focus on one at a time to ensure each gets the attention it deserves.
Rotating for Even Baking
Wood-fired ovens can have hot spots, so rotating your pizza is essential for even cooking. Use a long-handled turning peel to gently lift and rotate the pizza 180 degrees halfway through the cooking process. This ensures the crust cooks evenly, and no side gets too dark or remains underdone. If you notice one spot browning too quickly, you can even rotate it more frequently.
The beauty of a wood-fired oven is its speed, but that also means you need to stay attentive. A perfectly cooked pizza is all about timing and small adjustments.
For more creative pizza ideas and techniques, check out innovative takes on classic pizzas to take your wood-fired cooking to the next level.
Cleaning and Maintaining Your Pizza Oven
Removing Ash and Debris
After every use, it’s a good idea to clean out the leftover ash and wood debris. Ash buildup not only looks messy but can also affect the oven’s performance. Use a metal ash rake or a small shovel to sweep out the ash. Make sure the oven is completely cool before you start. Dispose of the ash in a metal container to avoid any fire hazards.
Inspecting for Damage
Every few uses, take a moment to check your oven for any cracks, chips, or wear. These small issues can grow into bigger problems if ignored. Look at the oven floor, the dome, and the door for any signs of damage. A quick inspection can save you from costly repairs later. If you see anything concerning, address it sooner rather than later.
Seasonal Maintenance Tips
At least once a year, give your oven a more thorough cleaning and maintenance check. Here’s a quick list of what to do:
- Deep clean the oven by scrubbing the interior with a stiff brush to remove soot and grime.
- Check the chimney or vent for blockages that might affect airflow.
- Reseal the oven if it’s made of materials like brick or clay that require occasional sealing.
Keeping your pizza oven clean and well-maintained doesn’t just make it last longer—it also ensures every pizza you bake comes out tasting its best.
Wrapping It Up
Making wood-fired pizza at home is a fun and rewarding experience. Sure, it might take a little practice to get the dough just right or to figure out the perfect timing, but that’s part of the charm. Whether you’re using a traditional wood-fired oven or mimicking the effect in your home oven, the end result is always worth it. There’s nothing quite like the taste of a pizza you made yourself, with that crispy crust and melty cheese. So, grab your ingredients, fire up the oven, and enjoy the process. Your perfect pizza is just a few steps away!
Frequently Asked Questions
What kind of wood should I use in a wood-fired pizza oven?
Use hardwoods like oak, maple, or ash as they burn hot and clean. Avoid softwoods like pine, as they contain sap and can produce harmful smoke.
How long does it take to preheat a wood-fired pizza oven?
It typically takes 45 minutes to an hour to reach the ideal temperature of 750°F for cooking pizza.
Do I need any special tools to cook wood-fired pizza?
Yes, tools like a pizza peel, an infrared thermometer, and a brush for cleaning the oven are helpful.
Can I use store-bought dough for wood-fired pizza?
Absolutely! While homemade dough is great, store-bought dough can save time and still taste delicious.
How do I know when my pizza is fully cooked?
Look for a golden crust and bubbling cheese. In a wood-fired oven, pizzas usually cook in about 2 minutes.
How do I clean my wood-fired pizza oven?
Let the oven cool completely, then use a brush to remove ash and debris. Avoid using water or cleaning chemicals.